【iphoneアプリ開発_初心者必見】UITextFieldの基礎・基本
最終更新日:2020年08月14日

家に引きこもっている「ゴルトン社長」です。(twitter : @GoRuton_1stStep)
UITextFieldの基礎・基本
- 文字入力で頻繁に使う項目ですので,ぜひマスターしましょう
- UITextField/UITextViewの文字入力で覚えておくと便利です。
人気の記事!
人生を変えたい人に向けて「はじめの一歩」を踏み出したい人にオススメ!
www.goruton.com www.goruton.com www.goruton.com www.goruton.com
1)ボタン押下でキーボードを閉じる
UITextFieldをタップするだけでキーボードが表示されますが,その後閉じることができません
【手順】
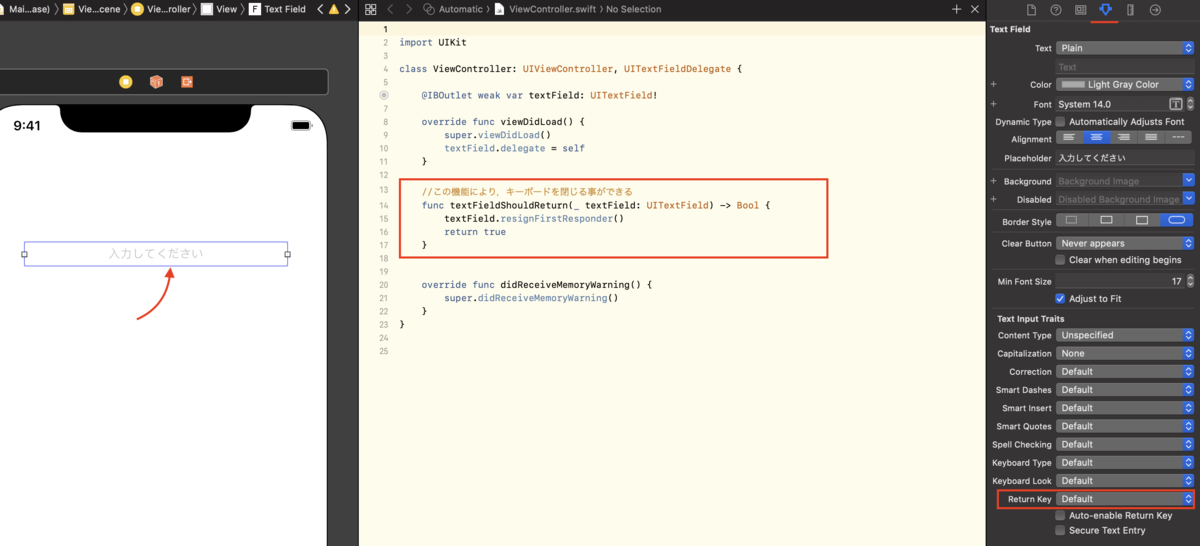
- StoryboardでUITextFieldを選択
- アトリビュートインスペクタから「Return Key」を「Default」から「Done」に変更
- UITextFieldをOutletでソースと紐づけ
- Delegateの設定をし、必要なデリゲートメソッドを記述

import UIKit

class ViewController: UIViewController, UITextFieldDelegate {

    @IBOutlet weak var textField: UITextField!

    override func viewDidLoad() {
        super.viewDidLoad()
        textField.delegate = self
    }

    //この機能により,キーボードを閉じる事ができる
    func textFieldShouldReturn(_ textField: UITextField) -> Bool {
        textField.resignFirstResponder()
        return true
    }


    override func didReceiveMemoryWarning() {
        super.didReceiveMemoryWarning()
    }
}
2)ボタン押下で次のUITextFieldに移動する
入力フォームのような複数のUITextFieldがある場合,ボタンを押して次のUITextFieldに移動するように設定します。
【手順】

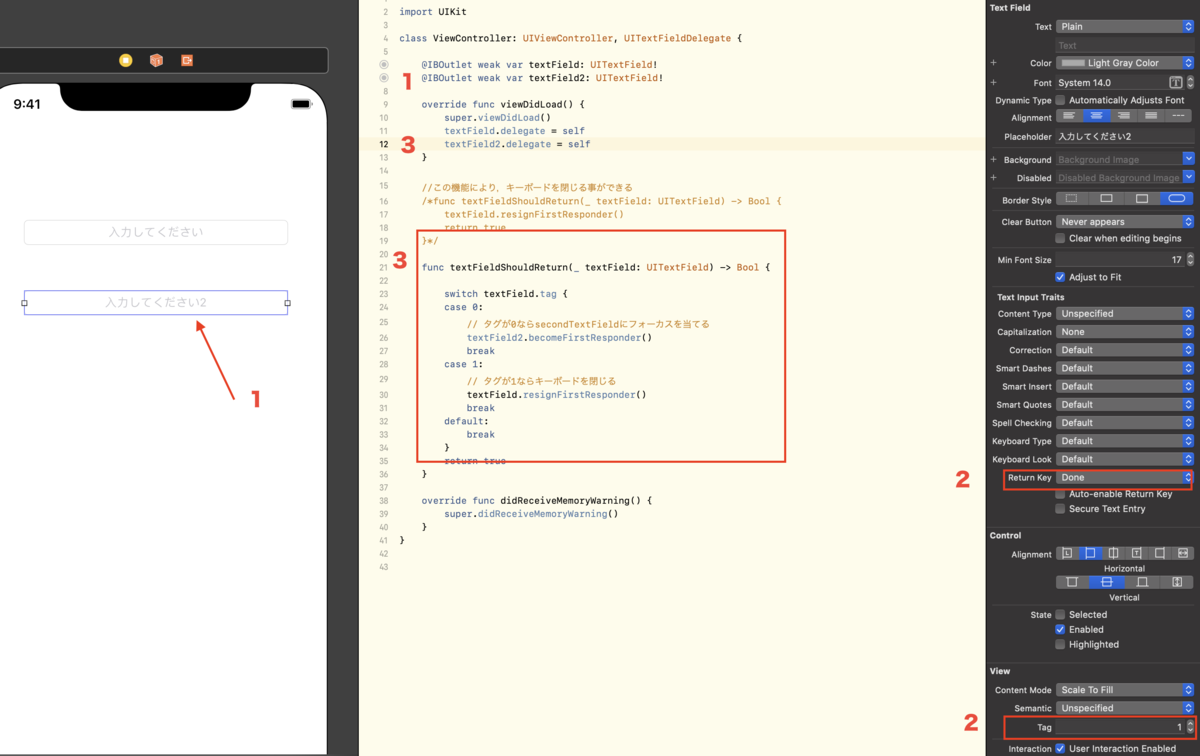
- UITextFieldを追加してOutletで繋ぎます。
- 最初のUITextFieldにはタグに0(デフォルト)で,「Return Key」を「Done」から「Next」に変更
- 追加したUITextFieldには「1」を設定し,[Return Key」を「Default」から「Done」に変更
- 下記のswiftコードを記載する
- ボタンが押されたUITextFieldのタグによって次に進むか,キーボードを閉じるかを判断します。
import UIKit
class ViewController: UIViewController, UITextFieldDelegate {

    @IBOutlet weak var textField: UITextField!
    @IBOutlet weak var textField2: UITextField!

    override func viewDidLoad() {
        super.viewDidLoad()
        textField.delegate = self
        textField2.delegate = self
    }

    //この機能により,キーボードを閉じる事ができる
    /*func textFieldShouldReturn(_ textField: UITextField) -> Bool {
        textField.resignFirstResponder()
        return true
    }*/

    func textFieldShouldReturn(_ textField: UITextField) -> Bool {

        switch textField.tag {
        case 0:
            // タグが0ならsecondTextFieldにフォーカスを当てる
            textField2.becomeFirstResponder()
            break
        case 1:
            // タグが1ならキーボードを閉じる
            textField.resignFirstResponder()
            break
        default:
            break
        }
        return true
    }

    override func didReceiveMemoryWarning() {
        super.didReceiveMemoryWarning()
    }
}
3)画面タップでキーボードを閉じる
基本的には,UITextFieldのキーボードを仕舞うインターフェースがありません。 そのため,大体のアプリでは画面の他の部分をタップするとキーボードが閉じるように設定されています。
【手順】

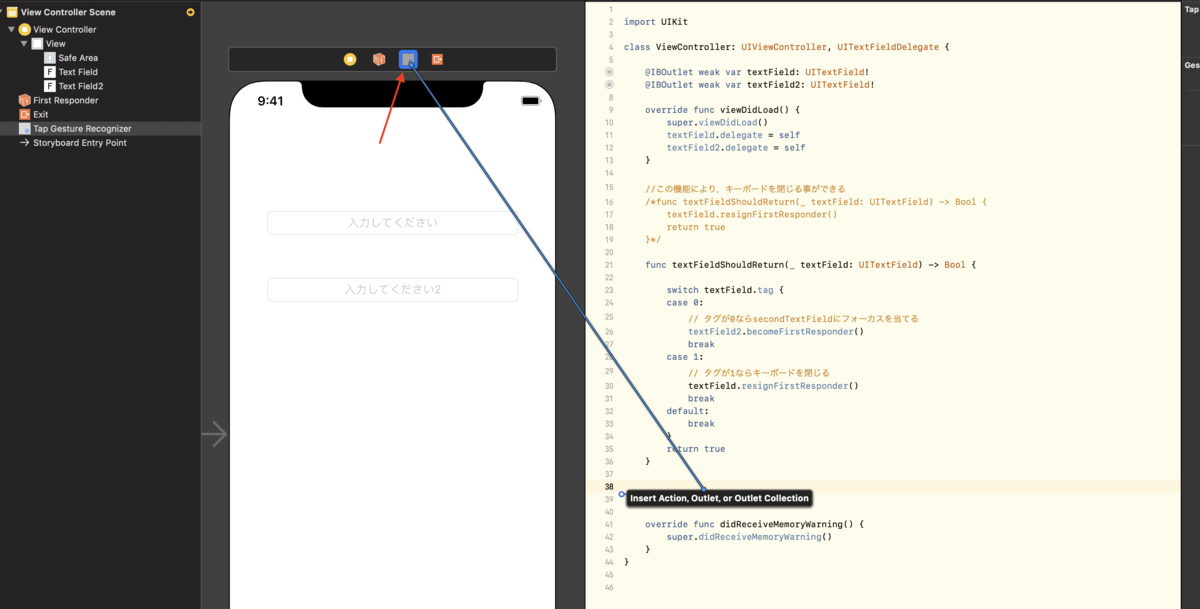
- タップジェスチャーを追加します。
- Storyboardで「Tap Gesture Recognizer」をviewに追加します。
- 追加するとViewController上部に表示されるのでそこからソースと紐づけます。
- OutletではなくActionで紐付けします
- 下記のswiftコードを記載する
// 画面タップ時に呼ばれる
    @IBAction func tapScreen(_ sender: Any) {
        self.view.endEditing(true)
    }
4)入力欄にかぶらないように画面をひょいっと動かす
色々なやり方がありますが、簡単な方法は入力時に画面自体を動かす事かと思います.
【手順】
- ボタンを追加してキーボードに隠れてしまうように設置します。
- 仮にログインボタンとします。
5)UITextViewの表示に関して
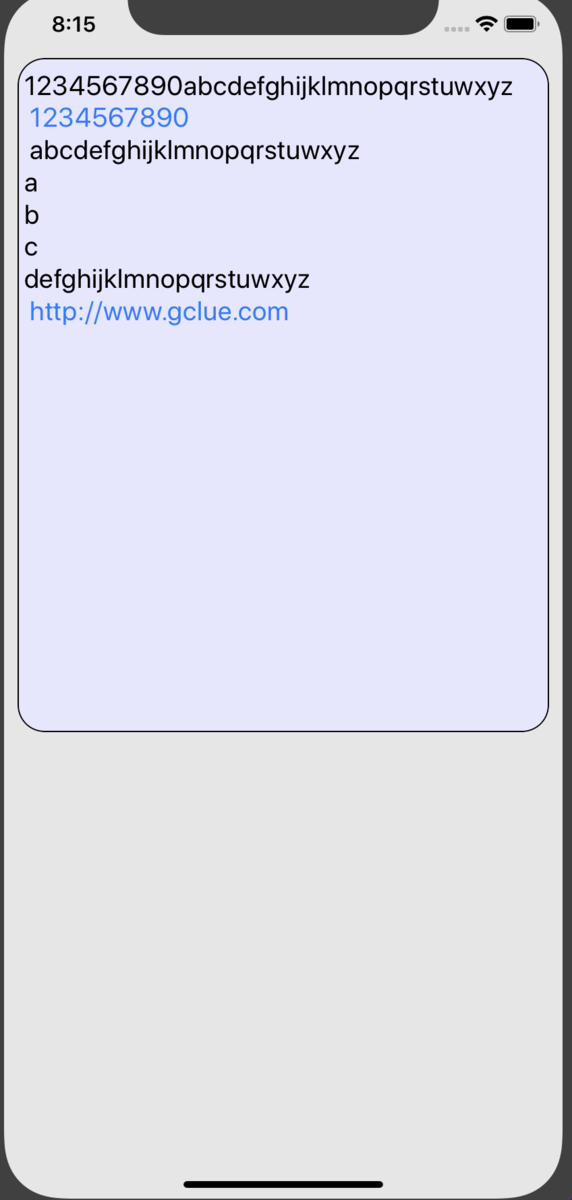
- 今回は,MainStoryBoardとSwiftコードを紐付けずにコードのみで記述してみます
- MainStoryBoardには何も部品を配置しません

//  ViewController.swift
//2019/06/25

import UIKit

class ViewController: UIViewController {

    override func viewDidLoad() {
        super.viewDidLoad()
        // 背景を灰色に設定する.
        self.view.backgroundColor = UIColor(red: 0.9, green: 0.9, blue: 0.9, alpha: 1.0)
        // TextView生成する.
        let myTextView: UITextView = UITextView(frame: CGRect(x: 10, y: 50, width: self.view.frame.width - 20, height: 500))
        // TextViewの背景を黃色に設定する.
        myTextView.backgroundColor = UIColor(red: 0.9, green: 0.9, blue: 1, alpha: 1.0)
        // 表示させるテキストを設定する.
        myTextView.text = "1234567890abcdefghijklmnopqrstuwxyz\n 1234567890\n abcdefghijklmnopqrstuwxyz \na\nb\nc\ndefghijklmnopqrstuwxyz"
        // 角に丸みをつける.
        myTextView.layer.masksToBounds = true
        // 丸みのサイズを設定する.
        myTextView.layer.cornerRadius = 20.0
        // 枠線の太さを設定する.
        myTextView.layer.borderWidth = 1
        // 枠線の色を黒に設定する.
        myTextView.layer.borderColor = UIColor.black.cgColor
        // フォントの設定をする.
        myTextView.font = UIFont.systemFont(ofSize: CGFloat(20))
        // フォントの色の設定をする.
        myTextView.textColor = UIColor.black
        // 左詰めの設定をする.
        myTextView.textAlignment = NSTextAlignment.left
        // リンク、日付などを自動的に検出してリンクに変換する.
        myTextView.dataDetectorTypes = UIDataDetectorTypes.all
        // 影の濃さを設定する.
        myTextView.layer.shadowOpacity = 0.5
        // テキストを編集不可にする.
        myTextView.isEditable = false
        // TextViewをViewに追加する.
        self.view.addSubview(myTextView)

    }

    override func didReceiveMemoryWarning() {
        super.didReceiveMemoryWarning()
    }
}

参考リンク
- UITextField/UITextViewの文字入力で覚えておくと便利なこと
- マシなiOSアプリのフォームを実装・デザインする
- [iOS][Swift3.0] テキスト入力時のエフェクトが美しいTextFieldEffects
[Swift] ストーリーボード上でプロパティ指定可能なUIパーツの作り方(UITextField拡張) - Qiita
- 020 UITextViewで複数行のテキストの表示
最後に!!

最後までご覧いただき、本当にありがとうございます!!
最近は、たくさんの読者さんから「コメント」や「メッセージ」が届くようになりました!!
皆さんと会話できて嬉しいですし、コメントで毎日励まされています。
ありがとうございます!
これからも、ゴルトン社長は「毎日」ブログを更新しています! www.goruton.com www.goruton.com www.goruton.com www.goruton.com www.goruton.com
皆さんから人気がある記事
www.goruton.com www.goruton.com www.goruton.com www.goruton.com www.goruton.com
まとめ記事
www.goruton.com www.goruton.com www.goruton.com www.goruton.com www.goruton.com www.goruton.com www.goruton.com